There’s something undeniably impressive about a grilled tomahawk steak . With its long, dramatic bone and rich, marbled meat, this cut looks like it belongs in a high-end steakhouse rather than your backyard grill. But the truth is, with a little know-how and some patience, you can master the art of grilling this show-stopping piece of beef right at home. Whether you’re hosting a summer barbecue or simply treating yourself to a luxurious meal, a perfectly grilled tomahawk steak is sure to leave a lasting impression. In this guide, we’ll walk you through everything you need to know—from choosing the best cut to nailing that juicy, flavorful finish. Get ready to elevate your grilling game!
Table of Contents
Preparing Your Tomahawk Steak for Grilling
Choosing the Best Tomahawk Steak
When it comes to grilling a tomahawk steak, the first step—and arguably the most important one—is selecting the right cut of meat. After all, the quality of your steak will directly impact the flavor, tenderness, and overall success of your dish. Here’s how to pick the perfect tomahawk steak that will make your meal unforgettable.
Look for Marbling
Marbling refers to the small streaks of fat running through the meat, and it’s one of the key indicators of a great steak. These little ribbons of fat melt during cooking, infusing the meat with rich, juicy flavor and keeping it tender. When shopping for a tomahawk steak, look for one with plenty of marbling throughout the ribeye portion. The more evenly distributed the fat is, the better your steak will taste once it’s grilled.
Check the Thickness
Tomahawk steaks are known for their impressive size, but thickness matters just as much as the length of that dramatic bone. Ideally, you want a steak that’s at least 1.5 to 2 inches thick . This thickness ensures that the steak can cook evenly on the grill without overcooking the exterior before the inside reaches the perfect level of doneness. Thicker cuts also hold up beautifully to techniques like reverse searing, which we’ll cover later in this guide.
Opt for USDA Prime or Choice Grade
Not all steaks are created equal, and when it comes to tomahawks, you’ll want to aim for high-quality grades like USDA Prime or Choice . USDA Prime is the top tier, offering superior marbling and tenderness, while USDA Choice is still an excellent option if Prime isn’t available. If you’re buying from a butcher, don’t hesitate to ask about the grade of the steak—they’ll often have insider knowledge about what’s freshest and best.
Freshness Matters
While pre-packaged steaks from the grocery store might be convenient, nothing beats the quality of a freshly cut tomahawk steak from a trusted butcher. A good butcher can help you select the best cut, answer any questions you have, and even provide tips for preparation. Plus, fresh steaks typically have better flavor and texture compared to those that have been sitting in a package for days.
Consider Dry-Aged Options (If You’re Feeling Fancy)
If you really want to take your grilled tomahawk steak to the next level, consider opting for a dry-aged tomahawk . Dry aging is a process where the beef is hung in a controlled environment for several weeks, allowing natural enzymes to break down tough fibers and concentrate the flavors. The result? A steak that’s incredibly tender and packed with a deep, almost nutty flavor. Keep in mind that dry-aged steaks are pricier, but they’re worth it if you’re looking to impress your guests—or yourself!
Don’t Forget the Bone
One of the standout features of a tomahawk steak is its long, Frenched bone (a fancy term for when the bone is trimmed clean). Not only does the bone add visual appeal, but it also helps insulate the meat during cooking, ensuring it stays juicy and flavorful. Plus, there’s something undeniably satisfying about serving a steak with such a striking presentation.
Seasoning and Marinating Tips
Once you’ve chosen the perfect tomahawk steak, it’s time to think about how to season and prepare it for the grill. The good news is that a tomahawk steak doesn’t need much to shine—it’s already a flavorful cut of meat thanks to its rich marbling. However, a little extra care with seasoning and marinating can take your grilled tomahawk steak from great to absolutely unforgettable. Here are some simple yet effective tips to make sure your steak is bursting with flavor.
Keep It Simple with Salt and Pepper
Sometimes, less really is more. A high-quality tomahawk steak doesn’t need a complicated marinade or a long list of spices to taste amazing. In fact, a classic combination of kosher salt and freshly ground black pepper is often all you need. Kosher salt helps draw out moisture, creating a delicious crust when the steak hits the grill, while black pepper adds just the right amount of heat and aroma.
- Pro Tip: Be generous with your seasoning! Don’t be afraid to use more salt than you think you need—tomahawk steaks are thick, so they can handle it. Just remember to season both sides evenly.
Let the Steak Rest at Room Temperature
Before you even think about grilling, let your tomahawk steak sit out at room temperature for about 30 to 45 minutes . This step is crucial because it allows the steak to cook more evenly on the grill. If you throw a cold steak straight onto the grill, the outside might burn before the inside reaches the perfect level of doneness. Plus, letting the steak come to room temperature gives the seasoning a chance to penetrate the surface slightly, enhancing the flavor.
Experiment with Dry Rubs
If you’re looking to add a bit more complexity to your tomahawk steak, a dry rub is a fantastic option. Dry rubs are simply a mix of spices and herbs that you apply directly to the surface of the steak before grilling. They can range from simple to bold, depending on your taste preferences. Here’s a basic dry rub recipe to get you started:
- Ingredients:
- 1 tablespoon kosher salt
- 1 tablespoon freshly ground black pepper
- 1 tablespoon garlic powder
- 1 tablespoon onion powder
- 1 teaspoon smoked paprika (for a smoky kick)
- 1 teaspoon dried thyme or rosemary (optional)
Mix these ingredients together and rub them generously onto both sides of the steak. Let the steak sit with the rub on for about 15-20 minutes before grilling. The spices will form a beautiful crust when seared, locking in all that juicy flavor.
Marinate for Extra Flavor (Optional)
While a tomahawk steak doesn’t need a marinade to be delicious, marinating can add an extra layer of flavor if you’re looking to experiment. Marinades typically consist of an acid (like vinegar, citrus juice, or Worcestershire sauce), oil (such as olive oil), and seasonings or herbs. Here’s a simple marinade idea:
- Ingredients:
- ¼ cup olive oil
- 2 tablespoons Worcestershire sauce
- 2 cloves garlic, minced
- 1 tablespoon fresh rosemary, chopped (or 1 teaspoon dried)
- 1 tablespoon fresh thyme, chopped (or 1 teaspoon dried)
- 1 teaspoon kosher salt
- ½ teaspoon black pepper
Combine all the ingredients in a bowl, then pour the mixture over the steak in a resealable plastic bag or shallow dish. Make sure the steak is fully coated, and let it marinate in the fridge for 2 to 4 hours (or overnight if you have the time). Just be careful not to marinate it for too long—acidic marinades can start to break down the meat fibers if left on for more than 24 hours, making the steak mushy.
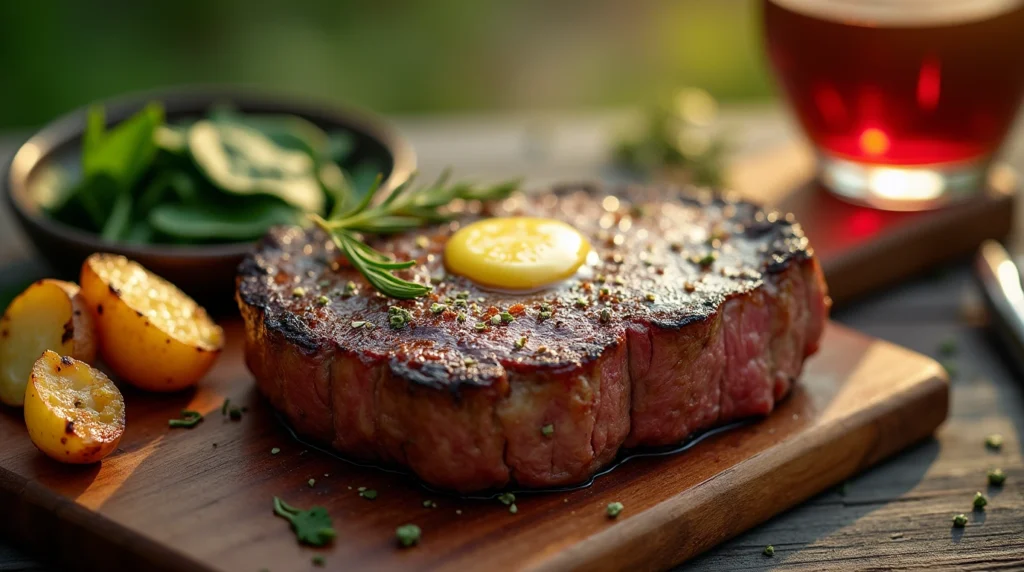
Don’t Forget the Garlic Butter Finish
One of the best ways to elevate your grilled tomahawk steak is by adding a dollop of garlic butter right after it comes off the grill. Garlic butter is incredibly easy to make and adds a luxurious touch to your steak. Here’s how:
- Ingredients:
- ½ cup unsalted butter, softened
- 2 cloves garlic, minced
- 1 tablespoon fresh parsley, chopped
- 1 teaspoon lemon juice (optional)
- Salt and pepper to taste
Mix all the ingredients together and let the butter firm up slightly in the fridge. Once your steak is done grilling and has rested for a few minutes, place a slice of garlic butter on top. As it melts, the butter will soak into the steak, adding a rich, savory finish that’s hard to beat.
Timing Is Everything
Whether you’re using a dry rub, marinade, or just salt and pepper, timing is key. If you’re using a dry rub, apply it about 15-20 minutes before grilling. For marinades, give the steak at least 2 hours (or overnight) to soak up the flavors. And no matter what method you choose, always let the steak rest at room temperature before it hits the grill.
By taking the time to properly season and prepare your tomahawk steak, you’re setting the stage for a truly mouthwatering meal. Now that your steak is seasoned to perfection, it’s time to fire up the grill and get cooking!
Tools You’ll Need for Grilling Success
Grilling a tomahawk steak is as much about the tools you use as it is about the technique. Having the right equipment can make all the difference between a perfectly grilled steak and one that’s overcooked or unevenly seared. Luckily, you don’t need a ton of fancy gadgets—just a few essential tools will set you up for success. Here’s a breakdown of what you’ll need to grill your tomahawk steak like a pro.
1. A Reliable Grill (Charcoal, Gas, or Pellet)
The first thing you’ll need is, of course, a grill ! Whether you’re a fan of charcoal, gas, or pellet grills, each has its own advantages when it comes to cooking a tomahawk steak.
- Charcoal Grill: If you’re looking for that classic smoky flavor, a charcoal grill is your best bet. Charcoal burns hotter than gas, which is perfect for achieving a nice sear on the outside of the steak while keeping the inside juicy. Plus, you can add wood chips (like hickory or mesquite) to enhance the smoke flavor.
- Gas Grill: For convenience and control, a gas grill is hard to beat. With adjustable burners, you can easily create zones of direct and indirect heat, which is ideal for techniques like reverse searing (more on that later). Gas grills also heat up quickly, making them great for weeknight dinners or impromptu BBQs.
- Pellet Grill: Pellet grills are a hybrid option that combines the smoky flavor of charcoal with the ease of gas. They use wood pellets as fuel, giving your steak a subtle, natural smoke flavor without the hassle of managing coals. Pellet grills are also great for maintaining consistent low-and-slow cooking temperatures, which works well for thicker cuts like a tomahawk steak.
No matter which type of grill you choose, make sure it’s clean and preheated before you start cooking. A dirty grill can cause sticking, and an improperly heated grill won’t give you those beautiful grill marks or even cooking.
2. A Meat Thermometer (Your Best Friend)
One of the most important tools for grilling any steak—especially a thick cut like a tomahawk—is a meat thermometer . Guessing the internal temperature of your steak by touch or color is risky, and no one wants to cut into their steak only to find it’s overcooked. A good meat thermometer takes the guesswork out of the equation and ensures your steak is cooked exactly to your desired level of doneness.
- Instant-Read Thermometer: These thermometers give you a quick, accurate reading of the steak’s internal temperature. Simply insert the probe into the thickest part of the steak (avoiding the bone), and you’ll know in seconds if it’s ready.
- Leave-In Thermometer: If you prefer to monitor the temperature throughout the cooking process, a leave-in thermometer stays in the steak while it cooks. This is especially helpful for techniques like reverse searing, where you want to slowly bring the steak up to temperature before finishing with a high-heat sear.
For a tomahawk steak, aim for these internal temperatures based on your preferred doneness:
- Rare: 120–125°F
- Medium-Rare: 130–135°F
- Medium: 140–145°F
- Medium-Well: 150–155°F
- Well-Done: 160°F+
Remember, the steak will continue to cook slightly as it rests, so it’s a good idea to pull it off the grill a few degrees before it reaches your target temperature.
3. Tongs (Not a Fork!)
When it comes to flipping your steak, tongs are your go-to tool. Never use a fork to flip or handle your steak—it can pierce the meat and let those precious juices escape, leaving you with a drier steak. Tongs give you a firm grip without damaging the surface of the steak, allowing you to flip it confidently and safely.
Look for sturdy, heat-resistant tongs with a comfortable grip. Some tongs even come with locking mechanisms, making them easy to store when you’re not using them. Trust us—once you’ve used tongs to handle your steak, you’ll never go back to anything else.
4. A Cast Iron Skillet (Optional but Recommended)
If you’re worried about flare-ups or want to finish your steak with a super-crispy crust, a cast iron skillet can be a game-changer. Cast iron retains heat incredibly well, making it perfect for searing steaks at high temperatures. You can use it directly on the grill grates or even on your stovetop if you’re finishing the steak indoors.
Here’s how it works: After reverse searing your tomahawk steak on the grill, transfer it to a preheated cast iron skillet for the final sear. Add a little butter, garlic, and fresh herbs to the skillet, and baste the steak as it finishes cooking. The result? A beautifully caramelized crust that locks in all the juices.
5. Chimney Starter (For Charcoal Grill Users)
If you’re using a charcoal grill, a chimney starter is an essential tool for getting your coals lit quickly and evenly. It’s a simple, cylindrical device that uses newspaper or fire starters to ignite the charcoal from the bottom, eliminating the need for lighter fluid (which can impart unwanted flavors to your food).
To use a chimney starter, fill it with charcoal, stuff a piece of newspaper or fire starter underneath, and light it. In about 10-15 minutes, you’ll have perfectly hot coals ready to dump onto your grill. Not only does this method save time, but it also ensures your coals are evenly lit, which helps maintain consistent heat while you’re grilling.
6. Grill Brush and Cleaning Tools
Finally, don’t forget to keep your grill clean! A grill brush is essential for scraping off any leftover residue from previous grilling sessions. A clean grill not only prevents sticking but also ensures that your steak gets those beautiful grill marks we all love.
- Pro Tip: Clean your grill grates both before and after cooking. Preheating the grill before cleaning makes it easier to remove any stuck-on bits, and cleaning after ensures your grill is ready for next time.
You might also want to invest in a grill scraper or foil brush if you’re dealing with stubborn debris. Keeping your grill in top shape will help you achieve better results every time you cook.
Mastering the Grilling Process
The Reverse Sear Method for Juicy Results
If you’ve ever struggled with grilling a thick cut of meat like a tomahawk steak—where the outside burns before the inside is cooked to perfection—you’re not alone. That’s where the reverse sear method comes in. This technique flips traditional grilling on its head, and it’s hands down one of the best ways to cook a tomahawk steak. By starting low and slow, then finishing with a high-heat sear, you’ll end up with a steak that’s evenly cooked, juicy, and packed with flavor. Let’s break it down step by step.
What Is Reverse Searing?
Reverse searing is exactly what it sounds like—it reverses the usual order of cooking. Instead of searing the steak over high heat first (which is how most people grill), you start by cooking the steak slowly at a lower temperature. Once the steak is almost done, you crank up the heat to give it a quick, intense sear on the outside. This method ensures that the inside of the steak is perfectly cooked without overcooking or burning the exterior.
Why does this work so well? Thick cuts like tomahawk steaks take longer to cook through, and if you start with high heat, the outside can burn before the inside reaches your desired doneness. By cooking low and slow first, you give the steak time to cook evenly from edge to center. Then, when you finish with a high-heat sear, you lock in all those juices and create a beautiful crust.
Step 1: Preheat Your Grill for Indirect Heat
The first step in reverse searing is setting up your grill for indirect heat . This means creating a two-zone fire—one side of the grill is hot (direct heat), and the other side is cooler (indirect heat). Here’s how to do it:
- Charcoal Grill: Pile your coals on one side of the grill, leaving the other side empty. Place the grate back on top, and let the coals heat up until they’re covered with white ash.
- Gas Grill: Turn on the burners on one side of the grill, leaving the other side off. This creates a hot zone and a cooler zone.
- Pellet Grill: Set your pellet grill to a low temperature (around 225°F–250°F) for indirect cooking.
Once your grill is set up, place the tomahawk steak on the cooler side of the grill (or in the indirect heat zone). This is where the magic begins.
Step 2: Cook Low and Slow
Now it’s time to let the steak cook slowly. Keep the grill lid closed and let the steak cook over indirect heat until it reaches about 10–15°F below your target internal temperature . For example:
- If you want your steak medium-rare (130–135°F), pull it off the grill when it hits around 115–120°F.
This slow cooking process allows the steak to cook evenly without developing a charred exterior too early. You can use your meat thermometer to check the internal temperature periodically, but try not to open the grill lid too often—it lets heat escape and slows down the cooking process.
Pro Tip: Add Smoke for Extra Flavor
If you’re using a charcoal or pellet grill, this is the perfect time to add some wood chips or chunks for extra smoky flavor. Hickory, mesquite, or oak are great choices for beef. Simply toss a handful of wood chips onto the coals or into the smoker box of your pellet grill, and let the smoke infuse the steak as it cooks. The result? A deep, rich flavor that complements the natural juiciness of the tomahawk.
Step 3: Crank Up the Heat for the Sear
Once your steak has reached the right internal temperature during the low-and-slow phase, it’s time to move it to the hot side of the grill for the final sear. This is where you’ll get that gorgeous crust and caramelized flavor.
- Increase the Heat: If you’re using a gas grill, turn up the burners to high. For charcoal grills, make sure your coals are still hot and glowing. Pellet grill users may need to switch to a higher-heat setting or even finish the sear in a cast iron skillet on the grill.
- Sear Each Side: Place the steak directly over the high heat and sear each side for about 1–2 minutes , depending on how thick the steak is and how hot your grill is. You’re looking for a deep brown crust with those coveted grill marks.
- Optional Basting: While searing, you can add a pat of garlic butter or fresh herbs (like rosemary or thyme) to the steak for an extra layer of flavor. Just drop the butter on top of the steak during the last minute of searing, and let it melt into the meat.
Step 4: Check the Final Temperature
After searing, double-check the internal temperature of the steak with your meat thermometer. Remember, the steak will continue to cook slightly as it rests, so aim to pull it off the grill a few degrees below your target temperature. For example:
- Medium-Rare: Pull at 125–130°F (it will rise to 130–135°F while resting).
- Medium: Pull at 135–140°F (it will rise to 140–145°F).
Why Reverse Searing Works So Well
The beauty of reverse searing is that it gives you complete control over the cooking process. By cooking the steak slowly first, you ensure that the inside is perfectly tender and juicy. Then, by finishing with a quick sear, you get that irresistible crust without overcooking the interior. It’s a foolproof method that works especially well for thick cuts like the tomahawk steak.
Bonus: Resting After Reverse Searing
Once your steak is done, resist the urge to dig in right away! Let it rest for 5–10 minutes on a cutting board. This resting period allows the juices to redistribute throughout the steak, ensuring every bite is moist and flavorful. Tent the steak loosely with foil to keep it warm while it rests.
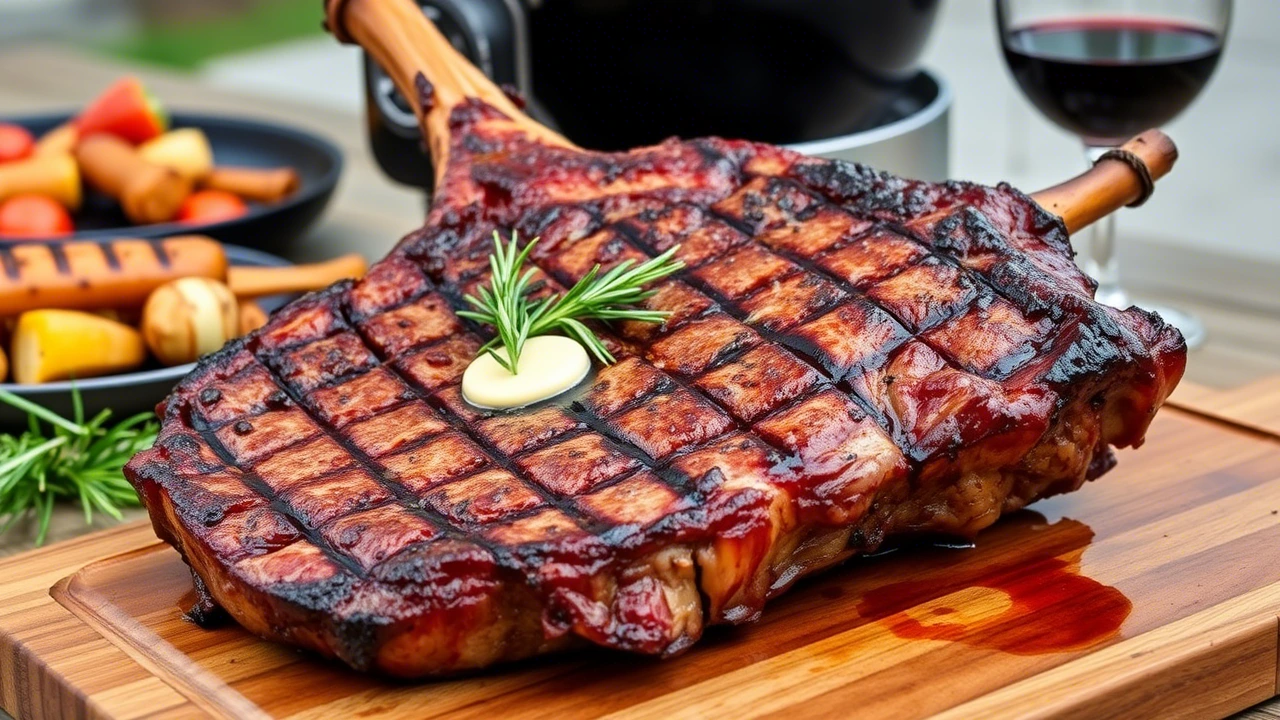
Achieving the Perfect Grill Marks and Crust
Let’s face it—grill marks are more than just a pretty pattern on your steak. They’re a sign of a job well done, a visual cue that your tomahawk steak has been kissed by the flames and is ready to impress. But beyond aesthetics, achieving the perfect crust is what truly elevates your steak from good to unforgettable. A well-seared crust not only adds texture but also locks in juices and enhances the flavor of the meat. Here’s how to get those Instagram-worthy grill marks and a mouthwatering crust every time.
1. Start with a Hot, Clean Grill
The foundation of great grill marks and a crispy crust begins with a hot, clean grill . If your grill grates aren’t hot enough or are covered in leftover residue, you’ll end up with uneven marks or sticking. Here’s how to set yourself up for success:
- Preheat Your Grill: Whether you’re using charcoal, gas, or a pellet grill, make sure your grill is fully preheated before you start cooking. For high-heat searing, aim for a temperature of at least 450°F–500°F . This ensures that the steak gets a quick, intense sear without sticking.
- Clean the Grates: Use a grill brush to scrub off any leftover bits from previous grilling sessions. A clean surface prevents sticking and helps the steak release easily when it’s time to flip. If you’re still worried about sticking, you can lightly oil the grates by dipping a folded paper towel in vegetable oil and using tongs to rub it over the grates.
A clean, hot grill is the first step toward achieving those beautiful crosshatch marks and a golden-brown crust.
2. Don’t Move the Steak Too Soon
One of the biggest mistakes people make when grilling is moving the steak around too much. To get those perfect grill marks, you need to let the steak sit undisturbed for a few minutes. Here’s why:
- Patience Pays Off: When you place the steak on the grill, it needs time to develop a good sear. If you move it too soon, the steak won’t have a chance to form those distinct marks. Let it sit for about 2–3 minutes on the first side before touching it.
- Resist the Urge to Peek: It’s tempting to lift the steak to check how it’s doing, but resist the urge! Every time you move the steak, you interrupt the searing process. Trust the heat of the grill to do its job.
Once the initial sear is done, you can rotate the steak 90 degrees to create those classic diamond-shaped crosshatch marks. Let it cook for another 1–2 minutes before flipping.
3. Rotate for Crosshatch Marks
Crosshatch marks are the hallmark of a perfectly grilled steak, and they’re surprisingly easy to achieve. After the steak has cooked undisturbed for a few minutes, use your tongs to gently rotate it a quarter turn (90 degrees) . This simple step creates the crisscross pattern that makes your steak look like it came straight from a high-end steakhouse.
- Timing Is Key: Rotate the steak after about 2–3 minutes of cooking on the first side. Once rotated, let it cook for another 1–2 minutes before flipping to the other side. Repeat the same process on the second side if you want symmetrical grill marks.
Remember, these marks aren’t just for show—they also indicate that your steak is getting an even sear across the surface.
4. Finish with High Heat for a Crispy Crust
While grill marks are important, the ultimate goal is to achieve a deep, flavorful crust . This is where high heat comes into play. The Maillard reaction—a chemical reaction between amino acids and reducing sugars—is what gives your steak that irresistible browned, caramelized exterior. To maximize this reaction:
- Crank Up the Heat: If you’ve been reverse searing, now is the time to move the steak to the hottest part of the grill. Whether you’re using direct heat on a charcoal or gas grill, or finishing in a cast iron skillet , high heat is essential for creating a crispy crust.
- Sear Each Side Quickly: Place the steak directly over the high heat and sear each side for about 1–2 minutes . You’re looking for a dark golden-brown color, but be careful not to burn it. Keep a close eye on the steak during this step, as high heat can quickly go from perfect to overdone.
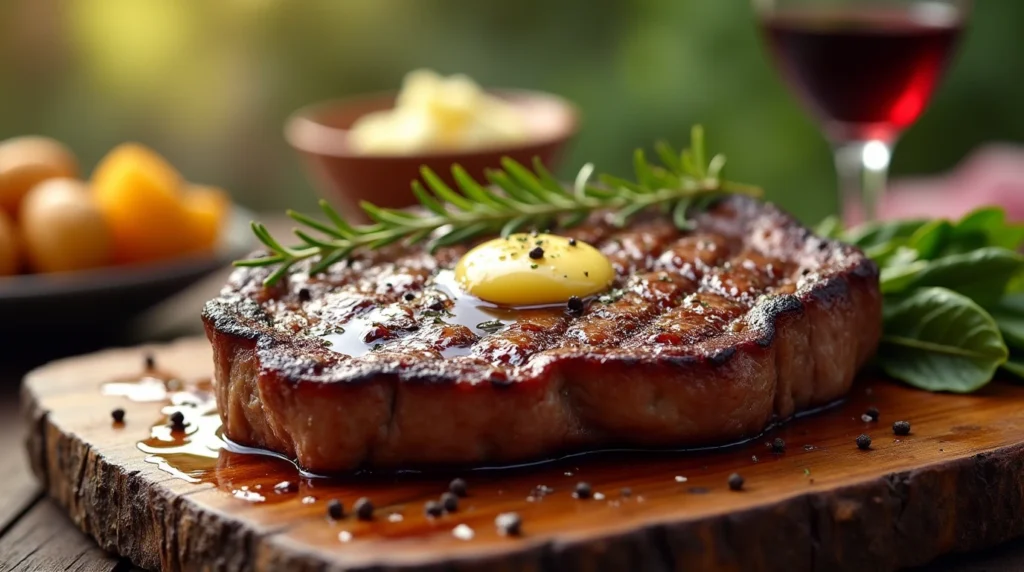
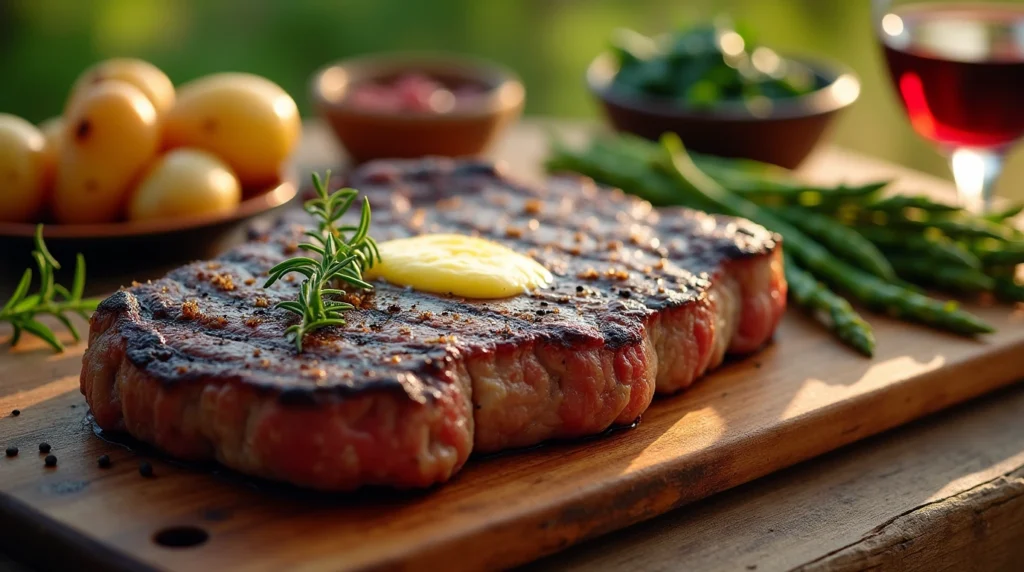
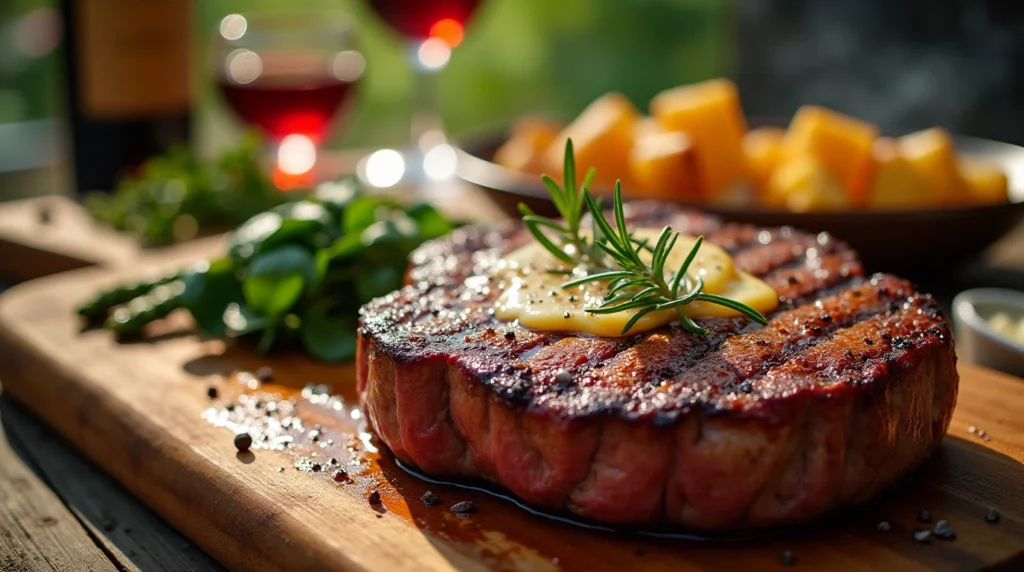
5. Add Butter and Herbs for Extra Flavor
To take your crust to the next level, consider adding butter and fresh herbs during the final moments of searing. This technique, known as basting , not only enhances the flavor but also helps create an even richer crust.
- How to Baste: During the last minute of searing, add a couple of tablespoons of garlic butter (or regular butter) to the steak. Toss in a few sprigs of fresh rosemary or thyme and a couple of smashed garlic cloves for extra aroma. Use a spoon to continuously baste the steak with the melted butter mixture. As the butter sizzles and infuses into the meat, it creates a glossy, flavorful crust that’s hard to beat.
This step isn’t just about flavor—it also helps the steak develop a deeper, more luxurious crust that’s packed with savory goodness.
6. Avoid Overcrowding the Grill
If you’re grilling multiple steaks or other items alongside your tomahawk, make sure not to overcrowd the grill. Overcrowding can lower the grill’s temperature and cause uneven cooking. Give your tomahawk steak plenty of space to ensure proper airflow and even heat distribution. This will help you achieve consistent grill marks and a uniform crust.
7. Let the Steak Rest Before Serving
Once you’ve achieved the perfect crust, it’s crucial to let the steak rest before slicing into it. Resting allows the juices to redistribute throughout the meat, ensuring that every bite is juicy and flavorful. Tent the steak loosely with foil and let it sit for about 5–10 minutes before carving.
- Pro Tip: While the steak rests, you can use this time to prepare any sides or sauces to complement your meal. A little compound butter or chimichurri sauce can add an extra layer of flavor to your already delicious steak.
Resting and Serving Your Grilled Tomahawk Steak
You’ve done the hard work—your tomahawk steak is perfectly grilled, with a beautiful crust, juicy interior, and those envy-inducing grill marks. But before you dive in, there’s one final, crucial step that can make or break your meal: resting the steak . Skipping this step can leave you with a plate full of juices instead of a steak that’s tender and flavorful. Let’s walk through how to properly rest your tomahawk steak, carve it like a pro, and serve it in a way that will have everyone at the table raving.
1. Why Resting Is Essential
When you take your steak off the grill, it’s still technically cooking. The residual heat continues to work its magic, gently raising the internal temperature by a few degrees (this is called “carryover cooking”). More importantly, resting allows the juices—which have been driven toward the center of the steak during cooking—to redistribute evenly throughout the meat. If you cut into the steak too soon, all those flavorful juices will spill out onto the cutting board, leaving you with a drier piece of meat.
- How Long to Rest: For a thick cut like a tomahawk steak, aim to let it rest for 5–10 minutes . This gives the juices enough time to settle back into the muscle fibers, ensuring every bite is moist and tender.
- Keep It Warm: While resting, loosely tent the steak with aluminum foil to keep it warm without trapping too much steam, which can soften the crust. You don’t want to lose that beautiful sear you worked so hard to achieve!
2. Carving the Tomahawk Steak Like a Pro
Once your steak has rested, it’s time to carve it. A tomahawk steak is essentially a bone-in ribeye, so slicing it properly ensures maximum tenderness and presentation. Here’s how to do it:
- Remove the Bone (Optional): Some people prefer to slice the meat off the bone before serving, especially if they’re plating individual portions. Use a sharp chef’s knife to carefully cut along the bone, separating the meat from the rib. You can then slice the meat into thick strips against the grain. Alternatively, you can leave the bone attached for a dramatic presentation—it’s entirely up to you!
- Slice Against the Grain: After removing the bone (if desired), look for the direction of the muscle fibers (the “grain”) in the steak. Cutting against the grain shortens the muscle fibers, making each bite more tender and easier to chew. Aim for slices that are about ½ inch to ¾ inch thick —thick enough to retain juiciness but thin enough to be manageable.
- Presentation Matters: Whether you leave the bone on or slice the steak into portions, arrange it on a large cutting board or platter for serving. Drizzle any juices that accumulated during resting over the slices for extra flavor.
3. Serving Suggestions
Now that your tomahawk steak is rested and carved, it’s time to think about how to serve it. This is where you can get creative and pair your steak with complementary sides and sauces that enhance its rich flavor.
- Classic Steakhouse Pairings: Keep it simple with classic steakhouse sides like garlic mashed potatoes , creamy spinach , or grilled asparagus . These dishes balance the richness of the steak without overpowering it.
- Fresh Salads: A light, refreshing salad can provide a nice contrast to the hearty steak. Try a mixed greens salad with a tangy vinaigrette or a tomato and cucumber salad with fresh herbs.
- Sauces and Toppings: While a perfectly grilled tomahawk steak doesn’t need sauce, a little something extra can elevate the dish even further. Consider serving it with:
- Compound Butter: A dollop of garlic-herb butter melting over the steak adds richness and flavor.
- Chimichurri Sauce: This zesty Argentinian sauce made with parsley, garlic, olive oil, and vinegar is a bright, tangy complement to the steak’s richness.
- Béarnaise or Peppercorn Sauce: For a more indulgent option, these classic steakhouse sauces are always crowd-pleasers.
- Wine Pairings: If you’re serving wine, a bold red like Cabernet Sauvignon , Malbec , or Syrah pairs beautifully with the robust flavors of a grilled tomahawk steak. For non-wine drinkers, a cold craft beer or sparkling water with lemon works just as well.
4. Make It a Shared Experience
One of the best things about a tomahawk steak is its size—it’s perfect for sharing! Instead of slicing the entire steak beforehand, consider bringing the whole thing to the table and letting guests carve their own portions. There’s something special about presenting a beautifully grilled tomahawk steak in all its glory, complete with the long, dramatic bone. It’s not just a meal; it’s an experience.
- Family-Style Dining: Place the steak on a large wooden board or platter, surrounded by sides like roasted vegetables, baked potatoes, or a fresh salad. Encourage everyone to dig in and enjoy the feast together.
- Interactive Fun: If you’re hosting a dinner party, let your guests try their hand at slicing the steak. Provide a sharp knife and show them how to cut against the grain for the most tender bites. It’s a great conversation starter and adds a personal touch to the meal.
5. Don’t Forget the Leftovers
If you happen to have leftovers (though with a tomahawk steak, that’s rare!), they can be just as delicious the next day. Thinly slice the leftover steak and use it in sandwiches, salads, or even tacos. The rich flavor of the grilled meat makes it incredibly versatile.
Conclusion
Grilling a tomahawk steak is more than just cooking—it’s an experience. From the moment you choose that perfect cut of meat to the final sizzle on the grill, every step is a chance to create something truly special. Whether you’re hosting a backyard BBQ, celebrating a special occasion, or simply treating yourself to a luxurious meal, a perfectly grilled tomahawk steak has the power to bring people together and leave a lasting impression.
You’ve Got This!
By now, you’ve learned everything you need to know to grill a tomahawk steak like a pro. You’ve mastered the art of selecting the best cut, seasoning it to perfection, and using techniques like reverse searing to achieve juicy, flavorful results. You’ve also discovered how to get those beautiful grill marks and a mouthwatering crust, and you know the importance of letting your steak rest before slicing into it. With these skills in your back pocket, you’re ready to tackle any grilling challenge with confidence.
It’s All About the Details
The beauty of grilling a tomahawk steak lies in the details. It’s not just about throwing a piece of meat on the grill—it’s about paying attention to the little things that make a big difference. A well-seasoned steak, a hot and clean grill, and a patient approach to cooking can transform a simple meal into something extraordinary. And let’s not forget the finishing touches—whether it’s a pat of garlic butter melting over the steak or a side of creamy mashed potatoes, those small extras can take your dish from great to unforgettable.
Share the Experience
One of the best parts about grilling a tomahawk steak is sharing it with others. There’s something magical about gathering around the table with family or friends, passing plates, and enjoying a meal that feels both indulgent and comforting. The tomahawk steak’s dramatic presentation makes it a natural centerpiece for any gathering, and the act of carving and serving it adds a personal, interactive element to the dining experience. So don’t be shy—invite your loved ones to join in the fun and make it a shared celebration.
Keep Experimenting
While this guide gives you a solid foundation, grilling is also about experimentation. Don’t be afraid to try new seasonings, marinades, or techniques to make the recipe your own. Maybe you’ll discover that you love a coffee rub on your steak, or perhaps you’ll find that finishing with a drizzle of balsamic glaze takes it to the next level. Grilling is as much about creativity as it is about tradition, so have fun with it!
Your Next Grilling Adventure Awaits
Now that you’ve conquered the tomahawk steak, why stop here? Use what you’ve learned to explore other cuts of meat or even different types of cuisine. The reverse sear method, for example, works beautifully for thick pork chops or lamb racks. Or maybe you’ll venture into smoking meats low and slow, experimenting with flavors like hickory, applewood, or cherry smoke. Whatever you choose, remember that grilling is a journey, not a destination.
We Want to Hear From You!
Finally, we’d love to hear how your tomahawk steak turned out! Did you nail the crust? Did your guests rave about the flavor? Or maybe you discovered a new trick along the way that you want to share. Leave a comment below or tag us in your social media posts—we’re always excited to see your grilling successes. And if you have any questions or need advice for your next cookout, feel free to reach out. We’re here to help!